Composting is a natural, biological process that breaks down plant waste from the kitchen, lawn and garden into a soil-like material called humus. It’s done by microorganisms that consume the organic material to produce compost.
By composting in your backyard, you can turn your yard waste and food scraps into a valuable soil enhancement that offers many long-term benefits.
Check out the educational resources available with Atlas Organics by visiting their Resource Library, with information including how to use compost.
Create Nutrient Rich Soil Amendment
Improve the fertility and health of your soil. Plants grown in healthy soil are more resistant to pests and diseases. As a mulch, compost conserves water, suppresses weeds, and protects the soil from compaction and erosion.
Compost Saves Water
Compost helps the soil hold moisture, reducing evaporation and water runoff.
Helps The Environment
Recycling valuable organic resources helps extend the lifetime of our landfill and reduces greenhouse gas emissions.
Choosing the composting system that is best for you
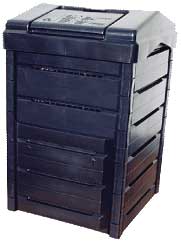
Backyard Composting
- Composting can be done in an open pile or in containers.
- Large yard
- Produce a lot of landscaping or green waste
- Takes 6 to 12 months to create finished compost
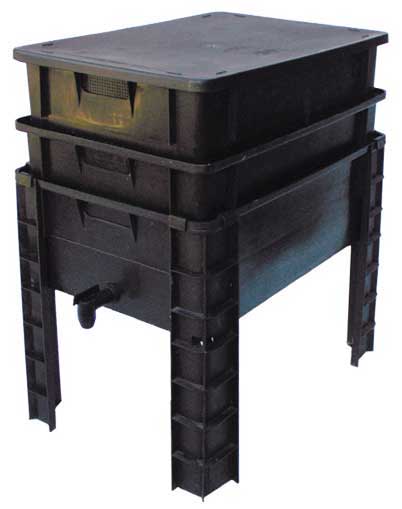
Vermicomposting (Composting with Worms)
- Small or No Yard
- Produce limited landscaping or green waste
- Only need to compost food scraps
- Takes only a few months to create finished compost
Containers confine the compost pile and make it more manageable and visually attractive. They can also provide weather protection, aid in heat retention and help keep animals out.
Backyard Composting Basics
Chop
Chop up materials if you want them to breakdown more quickly. The more you chop, the faster the decomposition process will be.
Mix
Turn or layer brown and green materials to avoid compaction and provide oxygen to the pile. A good rule of thumb for a healthy carbon to nitrogen balance is 50% to 70% green material to 50% to 30% brown materials, per volume.
Maintain
The air & water balance by keeping compost as moist as a wrung-out sponge. Aerate the pile by turning or creating air shafts. As the pile composts, it will shrink to half its original size or less.
Harvesting
Compost can be done a couple ways:
1) Move your bin structure next to where it lies now. Move un-composted materials back into bin and harvest finished compost. Sift or pick out any bigger unfinished pieces and put these back into the pile. 2) If your bin has a harvesting door, scoop out the finished compost from the bottom. Sift if desired.
Do Compost
Browns
- Fallen leaves
- Finely chopped
- woody prunings
- Pine needles
- Untreated wood sawdust
Greens
- Lawn clippings
- Young weeds
- Vegetable & fruit peels and scraps
- Coffee grounds
- Tea bags
- Breads and grains
- Egg shells
- Manures from non-meat eating animals
Do Not Compost
• Meat & bones
• Fish
• Dairy products
• Greasy foods
• Plywood sawdust
• Treated wood sawdust
• Diseased plants
• Dog, cat, or bird feces
• Poison oak
• Bermuda grass, ivy & rhizome grasses
• BBQ or coal ashes
Backyard Composting Troubleshooting
Too Dry? Moisten till slightly damp and maintain moisture.
Too much dry/woody material? Turn, chop, and add fresh green materials (like food scraps or fresh clippings) or manure.
Too wet?
Turn, add dry, brown materials.
Food scraps exposed?
Remove meat, grease, etc., and turn. Cover any food scraps with 2 inches of dry material or soil.
Food wastes in open bin, holes larger than 1/4″?
Turn compost and rodent-proof your bin.
Rodent attracting foods present?
Remove meat, grease, etc., and turn. Cover any food scraps with 2 inches of dry material or soil.
Four Essential Ingredients for Compost
Browns
Carbon rich, dry, woody materials such as fallen leaves, hay, dried plants and weeds.
Greens
Nitrogen rich, green, moist materials such as kitchen scraps, young weeds, and fresh grass clippings. Your “green” sources contain nitrogen and will help to heat up your pile.
Water
To accelerate composting, your pile should be moist but not wet, or the consistency of a wrung-out sponge.
Air
Oxygen, is added to the pile by turning, or layering with bulky materials to create air spaces between materials. Making sure your pile has air flow will significantly speed up its decomposition.
Vermicomposting (Worm Composting) Basics
Compost worms are called “red worms” or “red wigglers.” They are often found in compost piles, but are different from the earthworms you normally find in the ground. Their scientific names are Eisenia Fetida and Lumbricus Rubellus.
Feeding the Worms
Start your worms out with 2-3 quarts of scraps. Include some chopped up soft food (melon, grapes, cooked vegetables) or somewhat rotted foods that will decompose quickly. After the first feeding, feed the worms weekly, starting out with about a quart of food scraps per week. As they multiply, you can add larger quantities of food scraps. After a few months you can add about an inch of food scraps each week. To avoid fruit flies and odors, bury food under a layer of the bedding. Don’t dump and run!
Maintaining your Worm Bin
Add fresh bedding every few weeks. Always keep a two- inch layer of fresh bedding over the worms and food in your bin. Shredded, nonglossy newspaper works great! Keep bedding a little wetter than a wrung out sponge. In a plastic bin, add dry bedding to absorb excess moisture.
Harvesting
After you have fed your worms for 3 to 6 months, you’ll see some worm compost in the bottom of your bin. You can harvest what’s there, or wait until your bin is nearly overflowing. No matter which method you use, some worms will remain in the compost. Worms put in the garden with the compost will not live long, but your main goal is to reserve enough worms to re-start your bin.
Here are a few methods for separating the worms from the compost
Method #1: Most of the uneaten food, bedding and worms will probably be in the top third of your bin. Remove this material, worms and all, and put it aside to start a new bin. Remove the remaining material from the bin for use as compost. Put the uneaten food, bedding and worms back in the bin, and resume feeding and maintaining your bin.
Method #2: This method works only in bins over three feet long. Move the contents of your worm bin to one side, place fresh bedding in the empty space and bury your food wastes there for a few months. Harvest the other side after most of the worms have moved into the new food and bedding.
Method #3: Spread a sheet of plastic out in the sun. Dump the contents of the worm bin and build a few cone shaped piles on the sheet. Gently remove the top layer of each pile until you see worms. To escape the light, the worms will dive deeper into the piles. After repeating the process every 20 minutes or so for a few hours, you will be left with a wiggling pile of worms. Return the worms to their bin with some of the compost for bedding.
Do Feed Worms
Worms like to eat many of the same things we eat, only they aren’t as picky. Stale bread, apple cores, lettuce trimmings, coffee grounds, and nongreasy leftovers are just some of the foods we usually discard that worms love.
Worms prefer smaller-sized scraps and will eat through them more quickly than large or whole pieces of food.
- Vegetables Scraps
- Fruit Scraps and peels (mold/rot is fine)
- Bread and grains
- Tea bags
- Non-greasy leftovers
- Coffee grounds & filters
- Crushed egg shells
- Napkins, paper towels
Do Not Feed Worms
- Meats, fish
- Greasy foods
- Dairy products
- Twigs and branches
- Dog, cat, or bird feces
Don’t overfeed citrus should be no more than 1/5 of worm food (put in backyard compost)
Vermicomposting Troubleshooting
Too much food in bin, starting to heat up like hot compost? Feed less food or less often or get another bin.
Too dry? Add water until slightly damp.
Too wet? Add dry shredded paper.
Food exposed? Bury food complety.
Spring fruit fly invasion? Feed less fruit, put bin outside away from people.
Backyard Composting Videos
Watch and learn how to easily compost yard clippings and kitchen scraps!
Vermicomposting - Worm Composting
Learn the basics of vermicomposting and how easy it is for worms to eat your food scraps!